
What are Track Changes?
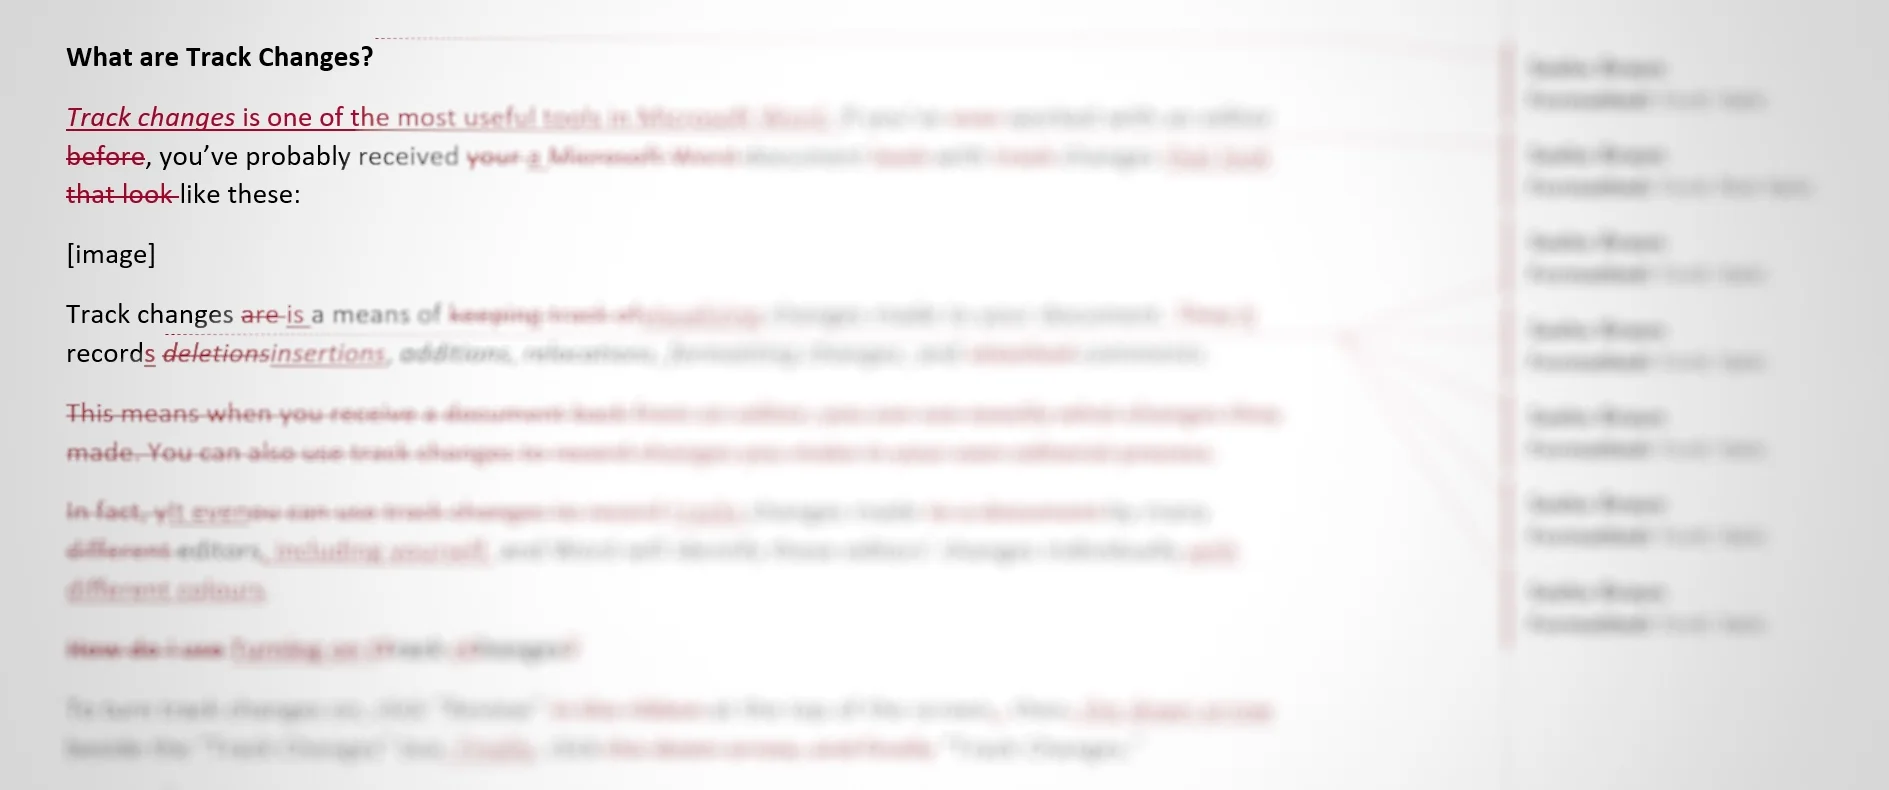
Track changes is one of the most useful tools in Microsoft Word. If you’ve ever worked with an editor, you’ve probably received a document back that looked like this:

Track changes is a means of visualizing changes made to your document. It records insertions, additions, relocations, formatting changes, and comments.
It even tracks changes made by many editors, including yourself, and Word will identify these editors’ changes individually with different colours.
Turning on track changes
To turn track changes on, click “Review” at the top of the screen then the down arrow beside the track changes box. Finally, click “Track Changes.”

You can also simply click the track changes box. When this box is dark grey, track changes is on. When it is light grey, track changes is off. To turn track changes off, click the box again.
With track changes on, Word records all changes made to the document. Deletions appear as strike-through, while additions appear bold and underlined. These changes are also shown with colours, usually red (see above).
Formatting changes and comments appear as bubbles on the right.

Showing track changes
Sometimes, track changes can be visually distracting, but we still want Word to record our changes. Luckily, Word lets us customize what changes we see and don’t see.

The top drop-down menu beside the track changes box allows you to choose between four views.
“Simple Markup” shows a relatively clean markup. Text appears as normal with coloured bars on the left indicating lines with changes made.

“All Markup” shows deletions and insertions inside the body of text, as shown earlier, with formatting changes and comments on the right.
“No Markup” hides all track changes and shows what your finalized document would look like if you accepted all track changes now.
Lastly, “Original” shows what your document looked like before you tracked changes.

You can also customize what kinds of changes you see by clicking the “Show Markup” drop-down menu, then checking your preferences.

Word also lists your changes in the “Reviewing Pane,” which can be shown horizontally or vertically with the “Reviewing Pane” pull-down menu.
What about comments?
Comments allow a reader or editor to comment on the text or engage in a dialogue with the writer (or other editors). Word offers three ways to create a comment. You can firstly highlight the text you wish to comment on, then right-click and choose “New Comment.”
A speech bubble containing your user name will appear on the right or in a dialogue box, depending on how your markup set, in which you can type your message.

You can also add a comment by clicking “New Comment” under “Review.”

Lastly, you can add comment with the shortcut ctrl+alt+m.

To delete a comment, right-click the comment, then choose “Delete Comment.” You can also use the delete button at the top of the screen.
Accepting and rejecting changes
You can choose what changes to retain or reject. Accepting a change finalizes it into the document and erases it from the record. Rejecting a change removes it from the document.

You can accept or reject individual changes, some changes, or all changes. The directions for approving and rejecting are the same. To accept or reject all changes in the document, click the down arrow beneath “Accept/Reject,” then “Accept/Reject All Changes.”
To accept or reject an individual change, right-click the change, then choose “Accept” or “Delete.”

You can also place your cursor inside the change, then click “Accept/Reject This Change” from the relevant drop-down menu at the top of the screen.

Caution: While accepting/rejecting individual changes is useful, doing so with a professionally edited document can create problems in the text and waste your money. If you choose to select individual changes from your editor, have your editor do a final proofread before you submit/publish your writing.
You can also choose to approve or reject only those changes currently shown on the screen (“Show Markup” is particularly useful, here). Click “Accept/Reject All Changes Shown” from the appropriate drop-down menu.
Customizing track changes
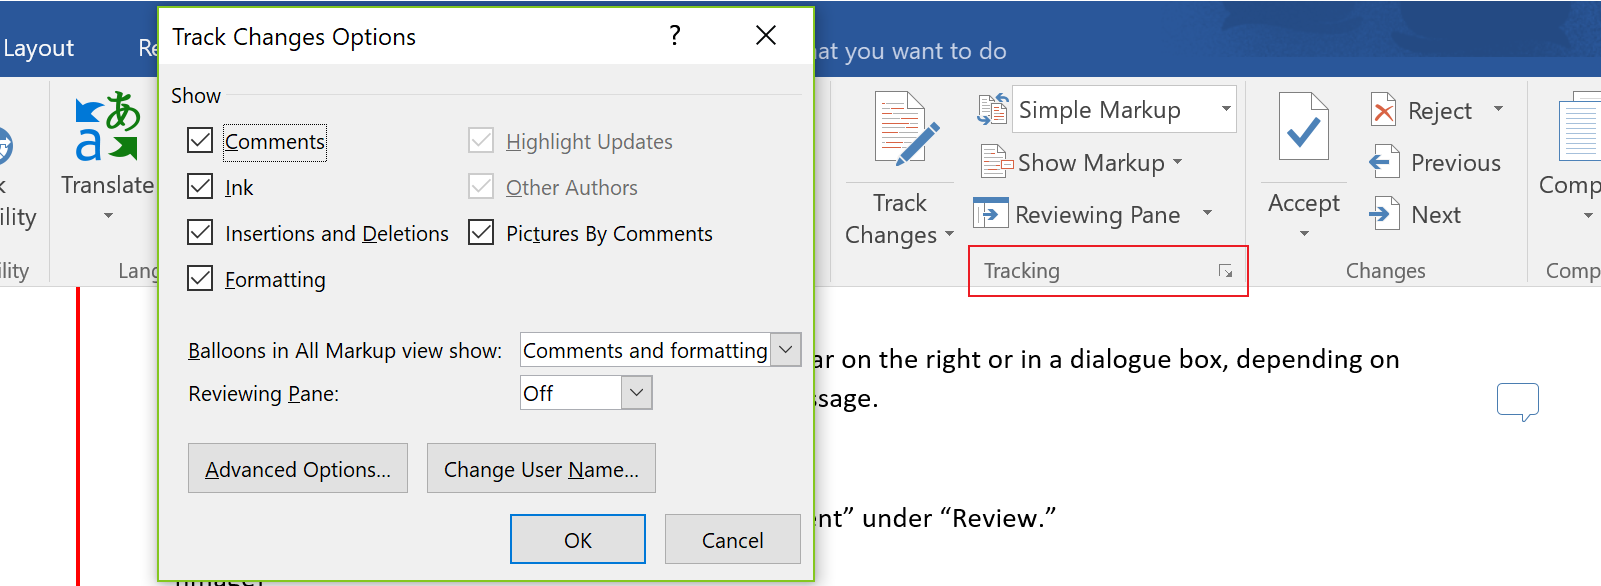
To view other customization options, click the tiny arrow (pointing bottom left) beside “Tracking.”
In the dialogue box that appears, you can again choose which changes you see. You can also change the user name your changes are recorded under and customize the colours of different kinds of changes.

To change your name, click “Change User Name,” then, in the next box, change your name or initials under the “Personalize your copy of Microsoft Word” heading.

To customize your colours, go to the previous dialogue box and click “Advanced Options.”
You can also change how different kinds of changes appear. For example, if you don’t like deletions appearing as strikethrough, you can change them to italics or something else.
There are many options in this box and I encourage you to find the look you are most comfortable with. I hope you found this blog post useful and that it opens up new editorial possibilities in your writing.